Showing posts with label Recipes. Show all posts

Sunday, February 27, 2011

A newfound respect for Gnocchi!

Another culinary evening took place last night, and the theme of the night was Italian food!
I had the brilliant idea that we ought to try making out own pasta, and since neither of us have any pasta attachments for making spaghetti or other types, I suggested gnocchi. (Apparently there is a tool for making gnocchi as well,  but it wasn't needed in order to get the gnocchis made...).
For an appetizer, we chose to make baked mozzarella sticks with a very improvised marinara, as we both forgot about the marinara sauce until it was time to eat.... ;-)   Our main course was gnocchi with alfredo sauce and for dessert, we had a tiramisu planned.

BAKED MOZZARELLA STICKS
First up was the mozzarella sticks.  Let me first present you with the recipe we used:

1 package mozzarella string cheese (we used the light ones)
2 tbsp Flour
2 large egg whites, lightly beaten
1 cup dried bread crumbs (alternatively you can use cracker crumbs, cornflake crumbs or panko bread crumbs...)
Salt & Pepper

Marinara sauce for dipping (which we forgot..)

1. Place the cheese strings in the freezer at least 1 hour before you plan to make these. These will lessen the oozing of the cheese. Preheat oven to 400ºF.

2. Place the flour, egg whites and crumbs in 3 separate dishes. Season the flour with salt and pepper. Cut the cheese strings in 1/2 widthwise. Dip one cheese stick at a time into the flour to coat, then into the egg whites and then the crumbs. Dip it into the egg again and then the crumbs again, squeezing to help them adhere. It'll be messy, but try to cover the cheese completely. Place on a cookie sheet lined with parchment or sprayed with cooking spray. Repeat with all of the cheese.

3. Bake for 10 to 15 minutes, until golden.

Serve immediately with warmed marinara sauce.

Ok, so first of all, I recommend using plain crumbs without any seasoning in them. I don't know if the light mozzarella strings had more salt in them than the regular ones do (it's possible), but our mozzarella sticks, although they were tasty, were a little on the salty side.  Next time I won't be salting the flour, we will be using the entire egg not just the eggwhites for coating and we'll monitor the salt content better.

This was a very messy food to make, as you had to dip it in egg, then crumbs, then eggs again and THEN back in the crumb tray.  By the end of it, my fingers had more coatings of breadcrumbs on them than the mozzarella sticks did.  

We had forgotten about the marinara sauce, so we made an impromptu version.  We took a can of tomatoes and put it in the blender with some Italian seasoning and fresh basil.  It turned out pretty good for being improvised like this.  We also tried dipping the mozzarella sticks in salsa, and surprisingly enough, that did taste very good so it's a nice option if the marinara sauce somehow is forgotten.

Here are the covered mozzarella sticks, before baked.

After they came out of the oven, they looked like this and apart from being slightly salty, they tasted delicious and definitely warrants a second try (and more).  Love that we were able to bake them, thereby making them a little healthier than the fried ones.


GNOCCHI

Next up were the gnocchis & the alfredo sauce, and let me tell you, it was a good thing we had already fed everyone some mozzarella sticks already, because this gnocchi took some time.
Our recipe was one we found on Food Network, posted by Tyler Florence, and here it is:

2 pounds (about 4) baking potatoes, like russets
1 teaspoon salt
1/2 teaspoon baking powder
1 egg white
1 1/2 cups unbleached all-purpose flour

Directions
1. Pierce the potatoes several times so that moisture can escape during baking. Bake the potatoes in a preheated 400 degrees F oven for 1 hour until fork tender.

2. Peel the potatoes while they are still hot and press them through a potato ricer.
(Note: we didn't have a potato rices, so we used a cheese grater instead, which worked really well!)


3. Put the potatoes in a large bowl with salt, baking powder, and egg white. Add the flour a little at a time and mix with your hands until the mixture forms a rough dough. Do not over-work the dough.

4. Transfer the dough to a lightly floured surface. Gently knead the dough for 1 or 2 minutes until smooth, adding a little bit more flour, if necessary, to keep it from sticking.


5. Break off a piece of the dough and roll it back and forth into a rope, about the thickness of your index finger. Cut the rope into 1-inch pieces. Gently roll each piece down a wooden gnocchi board while pressing a small dimple with your finger. The gnocchi should be slightly curved and marked with ridges. This will allow the pillows to hold sauce when served.


6. Boil the gnocchi in batches in plenty of salted water. The gnocchi are done about 2 minutes after they float to the surface, remove with a slotted spoon, and serve.
If not cooking immediately, place the gnocchi in a single layer on a baking pan dusted with flour. Cover with ;plastic wrap and refrigerate for up to 12 hours.


Note: If the gnocchi start to feather and fall apart in boiling water, you need more flour. If the gnocchi don't float after 2 minutes and are hard, you used too much flour. 

Ok, so cooking and peeling the potatoes, no problems there. I'm Norwegian and one thing Norwegians know how to do, it's peeling potatoes.... it's right up there with skis & beer & aqua vita what tradition is concerned.   We didn't have a potato ricer (not did I know what it was.... but we asked someone who knows Italian food what the consistency of the potato would be like after going through a potato ricer, and we found that it would be about the same as if we used a cheese grater on it.  So we did, and that worked great.   The only advice I have if using a cheese grater, is to make sure that if any larger lumps break off the potato and fall into the mix, make sure to mash those chunks with a fork, because you don't want any lumps of potato in the gnocchi mix.

Little by little we added the flour and kneaded the dough as if it was a bread dough.  As the recipe does NOT offer a solution should the gnocchi dough end up with too much flour in it, we were very careful with the flour.  We figured that we'd essentially be screwed if too much flour ended up in the dough.  So to be sure, we broke off a small piece of the dough and made 5 gnocchis which we cooked, just to see if they would be "feathery" or if they would not rise to the surface.   The gnocchis behaved like good gnocchis should, they rose and were cooked perfectly.  Not bad!!
The only gnocchi that had a problem rising to the surface, was one that had a chunk of potato in it (ergo make sure to mash those lumps if you see them), but that also eventually rose to the top, but tasted slightly more "potatoey" than the rest of them.

Also, we didn't have a gnocchi board, so we just dented the gnocchis a little with our fingers and used a fork to make some stripes on the back.  In fact, after a few gnocchis had been made, we dropped the fork indents as well and we just made a dent in the gnocchi with our fingers and left it at that.  That turned out just fine!
It takes a long time to make gnocchi!  This was a pretty large serving, we were cooking for 6 people.  We were rolling, cutting and denting our hearts out, the entire counter was filled with little gnocchis waiting to be cooked, and we thought we'd never see the end of it.   We both had a newfound respect for gnocchi by the time we were done, and we now understand why not a whole lot of restaurants are serving it... (and when they do, it costs a little more...). Gnocchis are a lot of work!

BUT .... it was worth it and I'll do it again! The end result was fantastic! There was a HUGE difference in the taste between these gnocchis that were made from scratch and the ones we buy in the stores.  They tasted fantastic, so fresh, and we all ate a lot more than we should have.

We served it with an alfredo sauce (I'm not going to post a recipe, you can serve gnocchi with any types of sauces.... meat sauce, marinara...alfredo, pesto... just pick your favorite pasta sauce & go with it). In the alfredo sauce, we had added about 1/2 bag of a pea/carrot mix and some ham, just to have some protein and veggies in there to cut all the starch.  It tasted sooo good and despite the work that went into the gnocchi, I'm all set for doing it again.  Maybe I'll even look into getting a gnocchi board, who knows... it may help the process.


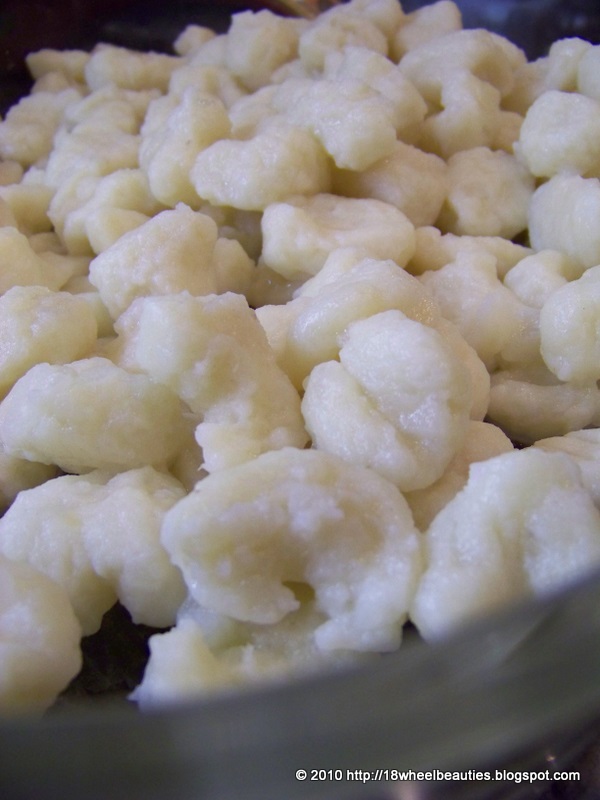
This is what the gnocchi looks like.... pre-gnocchi!


Here are our "test" gnocchis as they float to the top in the pot.


Here's a piece of the "sausage", from which I cut and shaped the gnocchis you see on the plate.
 

Our cooked "pride and joy" gnocchis!  None of them were rubbery, they ALL floated to the surface and none were feathery ... I'm quite impressed actually, it being our virgin gnocchis and all ...

Here's our alfredo sauce w/the added ham & peas/carrots
  

Gnocchi & Alfredo sauce, ready to eat!

Plated..... ladies and gentlemen, pick up your forks....


... and go for it!


After we consumed more than our share of gnocchi & alfredo sauce.... it was time for dessert.   The dessert, oddly enough, was the easiest to make.   So here's a riddle for you:

What do you get when you layer ladyfingers soaked in coffee & a mascarpone cream filling, then drizzle cocoa on top?


Ladyfingers .... soaked in coffee .... + mascarpone cream .... =

Tiramisu!!!
 

Can you say yum?


Yum!


The tiramisu came out great, although it was a LITTLE heavy on the coffee.... I think in the future, we may cut the coffee with some milk to balance the taste a little bit, but don't get me wrong .... it tasted good, and we ALL had seconds!!

Our Italian night went great, I say we did 3 for 3, all entrees came out great and all entrees are something I'd love to do over again.  Definitely a success!

Are you hungry yet?  ;-P


Sunday, January 30, 2011

Home Cooking and Monopoly!

I know.  This title goes against everything we tend to do in modern day society. Home cooking? Really? When it's just as easy to go out and eat something that's already cooked FOR us?  And Monopoly?  Hmm.... NOT on the Xbox you say.... or the Wii?  You actually have to manually roll the dice and move the pieces?
What a concept!! I'm in!!

Actually, my friend and I have gotten together before and cooked at home rather than going out somewhere.  It's fun and social and definitely a lot healthier than eating the corresponding food at a restaurant.
Tonight's menu was a combination of Mexican/Peruvian and Asian!  The jump between the two is perhaps not as big as you would think.  Our Peruvian dish of the night was Ceviche, which is raw fish and certainly, raw fish is a fairly common ingredient in Asian dishes, so there you go :) It tied together somehow.

I've included the calorie count on each dish at the end of each recipe. Please note that in all the recipes, I've used the "spray oil" to fry everything instead of actual oil, so if you do use oil to fry the chicken & veggies in, please make sure to add calories for the oil.

CEVICHE

Despite the raw fish in the Ceviche, the ingredient we were the most afraid of was the Habanero pepper.
Let me just tell you, I'm Norwegian born and bred and in Norway, the spiciest food mostly involves salt & pepper. (Although spicier dishes have been making its way in and Norwegians are slowly but surely getting introduced to spicier peppers....).   Jalapeno pepper is as spicy as I'll go, and even some jalapenos are too spicy for my taste.  Not in my wildest dreams would I touch a Habanero, and yet here I was, Habanero pepper in hand and ready to go.  To my surprise, while eating the Ceviche, I couldn't even detect that there was Habanero in there.... if I hadn't handled it myself, I wouldn't have known it was even in there. 
The ceviche turned out really amazingly good.  I'm not a big fan of fish (if you'll go back to my Baked Swai blog, you'll see what my relationship with fish is...), but I loved it in the ceviche.  Probably because it was cooked in lime, so the fish taste was pretty much non existent. 

Here is the recipe for the ceviche that we made:

2 Filets of Fish (super fresh/never frozen. Use tilapia, sole or snapper or even shrimp)
Remove spine on fish.
Cut into rounds or strips, as preferred.
Add lime juice and one crushed garlic clove, marinate the fish for 1 hour or more. (Until "cooked")
Slice 1/2 red onions transparently thin.
Chop cilantro and add to onions.
Use 1/4 of a habanero pepper, de-seeded

(Calorie count: About 360 for the entire bowl & 130 for 8 triscuits)

We ate our ceviche with triscuits, but I've also had it served on crispy corn tortillas and my friend had previously eaten it without any type of cracker/bread at all, so do as you prefer.  The triscuits actually went very well with the ceviche, it was a good combination.

Here's the ceviche, ready to go.  We used red snapper for the fish.
Also, the cilantro is very sparse as I'm not too crazy about cilantro, but
we added some on the side if anybody wanted more.


Here's the ceviche on the triscuit crackers.  They went together very well,
but it's also good when paired with a crisp corn tortilla ("flat taco shell")


EGGROLLS

Our second course of the night was homemade eggrolls.  We were both excited about this as neither of us had ever made eggrolls before.  In fact, I'm such a novice when it comes to home made Asian foods that I had no idea I could get bamboo shoots and water chestnuts in the regular grocery store.... but they have it! In fact, there's an entire section devoted to Asian foods.  Who knew!

Anyway, we were also going to bake the eggrolls, not fry them, to make them healthier.  We had no idea how this would turn out, as our recipe was made for frying.
The ingredients we mixed together smelled SO good, I'm actually surprised they made it to teh eggroll wrappers at all! We were both getting hungry while making them, so eating the eggroll stuffing straight from the bowl was something that wasn't an impossibility.  But we restrained ourselves....
Rolling the eggrolls was also fun, it's actually a very social food to make.  I've seen people make their own sushi and that always looks fun, but eggrolls are a better idea I think ... (This again relates back to my bad relationship with fish.... I have yet to meet a sushi I liked, so making my own sushi would be a gigantic waste for me...).

Here is the recipe we used for the eggrolls:

2 eggs, beaten
1/2 bag of coleslaw mix
1/2 (8 ounce) can shredded bamboo shoots (I actually got whole bamboo shoots and we just sliced them up into thin slices)
1/2 cup mushrooms, finely sliced
1/2 pound chicken (boneless, skinless)
1 green onions, thinly sliced
1-1/4 teaspoons soy sauce
1/2 teaspoon splenda
1/2 (14 ounce) package egg roll wrappers
1/2 egg white, beaten

(Calorie count: About 90 calories per egg roll)
1. Spray pan with nonstick spray (I used Safeway cooking spray with olive oil). Pour in the beaten eggs and let cook without stirring, until firmed (like an omelet). Flip the eggs over and cook for an additional 20 seconds to firm the other side. Set egg pancake aside to cool, then slice into thin strips.

2.Use the same pan, add more spray if needed. Add the coleslaw mix and cook for 2 minutes until wilted. Add bamboo shoots, mushroom, pork, green onions, soy sauce and splenda and continue cooking until the vegetables are soft. Stir in sliced egg, then scoop the mixture into a bowl and refrigerate until cold.
(We actually put ours in the freezer for a short amount of time and it cooled off almost immediately)

 3. ASSEMBLY OF EGGROLLS:
To assemble the egg rolls, place an eggroll wrapper onto your work surface with one corner pointing towards you. Place about 3 tablespoons of cooled filling in a heap onto the bottom third of the wrapper. Brush a little beaten egg white onto the top two edges of the wrapper (I actually put eggwhite all the way down on both sides), then fold the bottom corner over the filling and roll firmly to the halfway point. Fold the left and right sides snugly over the egg roll, then continue rolling until the top corners seal the egg roll with the egg white. Place the eggroll, seam down, on to a baking sheet (make sure baking sheet has been sprayed with PAM or a similar spray) and cover with a plastic wrap while making the rest of the eggrolls.
Repeat with remaining egg roll wrappers, covering the finished egg rolls with plastic wrap to keep from drying out.

Do one eggroll at a time and keep the remaining eggroll wrappers in plastic, so that they don't dry out.

4. When all eggrolls have been made, spray the top of each eggroll with PAM (or whichever spray you use).  Place in the middle of the oven on 400 F and bake for about 20 minutes.

Let cool for a few minutes, and enjoy, either by themselves or you can use additional dipping sauces, like teriyaki or sweet and sour.

The eggrolls turned out really good, I will definitely be making these again!

Here's the eggroll filling on the wrapper, ready to be rolled up!

Our finished eggrolls, sprayed with PAM and ready to go in the oven

Eggrolls, baked and ready to eat!

Eggroll on the plate with a drizzle of teriyaki sauce on top.


KUNG PAO CHICKEN


After we'd devoured the eggrolls, it was time for Kung Pao Chicken!  Kung Pao Chicken is one of the more calorie rich Chinese entrees usually, because of the sauce, so it was exciting to find a good recipe for a home made one, where we are more in charge of the calories.
Here is the recipe we followed for the kung pao chicken:

1 pound skinless, boneless chicken breast halves - cut into chunks
1 table spoon white wine (we didn't have any so we used a little white wine vinegar instead, worked great)
2 tablespoons soy sauce
1 tablespoon sesame seeds
2 tablespoons cornstarch, dissolved in 2 tablespoons water
1 ounce hot chile paste
1 teaspoon distilled white vinegar
2 teaspoons brown sugar (we actually used Splenda)
4 green onions, chopped
1 tablespoon chopped garlic
1 (8 ounce) can water chestnuts
4 ounces peanuts

1. Make a marinade for the chicken: Combine 1 tablespoon wine, 1 tablespoon soy sauce, a table spoon of sesame seeds and 1 tablespoon of the cornstarch/water mixture. Place chicken pieces in a glass dish or bowl and add the marinade. Toss to coat. Cover dish and place in refrigerator for about 30 minutes.

2. Making the Kung Pao Sauce: In a small bowl combine 1 tablespoon soy sauce, 1 tablespoon oil, 1 tablespoon of the cornstarch/water mixture, chili paste, vinegar and sugar. Mix together and add green onion, garlic, water chestnuts and peanuts. Let the sauce simmer on low heat until aromatic.

3. Meanwhile, remove chicken from marinade and saute in a large skillet until meat is white and juices run clear. When the kung pao sauce is aromatic, add the sauteed chicken to the sauce and let simmer until sauce thickens

(Calorie count: About 220 per serving + rice ... we used a brown rice, it was 150 calories per serving so the total count for this dish endedu p being 370.)

The Kung Pao turned out great! In fact, as we sat at the table, we all kept scooping a little more on our plates while we were talking, even though we were full and should have stopped eating.... lol. 
I will definitely make this again as well.  At 370 a serving, it is definitely doable as a diet food.

Kung Pao chicken in the pan, ready for consumption.

Kung Pao on the plate, with brown rice.

Kung Pao, Eggroll & Rice... yum.

(I'm getting hungry for more as I see these photos lol....)


 Hm... what's missing... oh yes! Dessert!! Well, there is no need for us to make dessert on our own because we have the world's best frozen yogurt only a few blocks away from where we live.. 21 Choices!   So after dinner, we headed out there and got our frozen yogurt, then we went home and played Monopoly.

I got this really cool Monopoly for Christmas, it's a "Nightmare before Christmas" Monopoly, where all streetnames and "railroads" etc has been converted to match the movie.  It's cool, it puts a different spin on the game.  It had been a long time since I played Monopoly and I had to brush up on the rules again. It was really fun! Who would've thought non-console or non-computer games could still be fun. :-)

Great night, a great time was had by all and I can't wait to repeat it sometime soon.


Friday, January 14, 2011

Macaroni Oven Bake

Ok, so while I was making macaroni soup yesterday, I spotted a recipe on the back of the macaroni bag that looked good.  I browsed through the ingredients what were required and found I had all inhouse.... with exception of an onion, however I did have onion powder, and that worked just as well!

Anyway, I had made a mac and cheese bake before, and that recipe I copied from a website that belongs to one of these fancy gourmet chefs.... you know.... the ones who know this kinda stuff. lol.   Well, that mac and cheese was very good, don't get me wrong, but the one that was listed on the back of thise 2 for $3 bag of Safeway macaroni blew that gourmet mac'n cheese away!

Anyway, here it is.... the recipe.  Highly recommended, it's so smooth and tasty, but be warned, it certainly isn't a diet food.

1 pound Elbow Macaroni
1/2 cup minced onion (or 1/2 tablespoon onion powder, in my case)
1/2 cup margarine or butter
4 tablespoons flour
1 teaspoon salt
4 cups milk
3 cups shredded cheddar cheese
Buttered bread crumbs

1. Cook the macaroni per instructions on the bag
2. Sautee the onion and the butter

Here comes the tricky part.... the sauce:

3. Add the flour to the butter, and whisk it around until it is smooth
4. Add the milk to the pot.  You will want to add the milk a little drop at a time in order to avoid getting the sauce lumpy.   Just add a small amount of milk, then mix it in with the butter/flour mix until it's smooth.  Keep repeating this, adding small amounts of milk to the mixture until the mixture is thinner, at which point you can pour in the rest of the milk.
5. Let the sauce simmer until it thickens while constantly stirring, and mind the pot as well... Since this is a milkbased sauce, it will boil over very quickly if you turn your back so just keep watching and stirring.
6. Once sauce thickens, add the cheese
7. Add the macaroni, fold it into the sauce mixture and stir it well.
8. Butter a pan (or spray with Pam, which I prefer) and pour macaroni mix into the pan.
9. Sprinkle with buttered bread crumbs.  (I use a can of premade breadcrumbs, which I sautee in a small amount of butter and sprinkle on top).
10. Bake for 25 minutes on 350 F
11. Serve up and eat! :-)

A photo of the finished macaroni oven bake!


And now, no more macaroni for awhile :-) I promise the macaroni fever has died down (and to those who asked, no I'm not pregnant, that is not the cause of my latest macaroni frenzy lol....)

In fact, starting Monday, it's dieting galore so I hope I'll be inspired to cook some healthier foods to keep dieting interesting.  

Thursday, January 13, 2011

Macaroni Soup!

Ok so I have no idea why or how I all of a sudden had a craving for Macaroni Soup.  Maybe I was thinking of home.... or maybe I was thinking of macaroni.... not sure.   Anyway, while growing up in Norway, Macaroni Soup was a fairly common dish that we were served as kids.  I've come to find that not every Norwegian has heard of Macaroni Soup, but most Norwegian moms have made this at one point.

I remember even cooking Macaroni Soup for my 4H project... I believe my 4H Projects that year revolved around cooking, and one of the dishes I made was macaroni soup. 

The thing about Macaroni Soup is that you have to stand over it and stir it while it's cooking.  It's milk based, and milk tends to boil over really fast. Before you know it, it's all over your kitchen. No joke.  I remember one time, my brother was going to surprise my mom and me with hot chocolate.  Mom and I were out somewhere, and he'd decided to make hot chocolate for us.  In those days, we didn't put powder in a cup and microwave it.  We made hot chocolate from scratch, which meant boiling milk.  When mom and I came back from our outing, safe to say, the entire kitchen was covered in milk.  Once that milk starts rising in the pot, there's no stopping it.  I'm sure it was one of those moments in my mom's life where she didn't know whether to praise or yell at her kid.  On one hand, it was sweet to want to surprise us with hot chocolate, on the other, both my brother and I knew to be careful with the stove, especially when home alone.
Not sure what the end result was.  I think my mom might have taken mercy on us and made us hot chocolate in the end after all ;-)

Anyway.  Here's the recipe for Macaroni Soup, if anyone wants to try it.  Really, don't knock it till you try it.  I know I can't wait to cook this for Aurora while she grows up.... on days she's sick, on rainy days or on days she just needs some comfort food.  Macaroni soup it is!

MACARONI SOUP RECIPE
(4 portions)

8 dl Milk  (3.5 Cups)
2 dl Water (3/4 Cup)
1.5 Table Spoons Butter/Margerine
4 Handfulls of macaroni (or more if you like a LOT of macaroni... I do!)
2 Tablespoons Sugar

Heat the milk, water and butter in a pot, up to boiling point.
Toss in the handfulls of macaroni and the sugar, boil until the macaroni is done (I prefer them a little chewy for this particular dish....).
(NOTE: As stated above, STAND BY THE POT the ENTIRE TIME!  If the milk decides to boil over, oh boy, it'll go fast!)

I also like to throw in a cinnamon stick while the macaroni is boiling to give it a faint cinnamon flavor.

Serve up in a bowl, drizzle cinnamon and sugar in top and enjoy!
Here's a photo of the finished product! :)


I enjoyed it as I knew I would. Not sure my husband enjoyed it as much, it's possible it's best when served alongside childhood memories :-)  Either way.... I'll make sure Aurora has some memories to go along with her macaroni soup :)